Samsung SmartThings Smart Home Hub
If you don’t have a Smart Things hub, you can buy one here: https://amzn.to/2G7XKTP
Or get yourself a starter kit here: https://amzn.to/2Vp0b9D
I started with the starter kit, and this helped me experience all the interesting functionality I can set up with a smart home hub such as the Smart Things hub.
Smart Things hub supports the Z-wave wireless communications protocol that is quite powerful. Z-wave not only supports wireless communications for sensors and devices, but it also allows some of these devices to repeat and extend the hub signal so that you can access remote corners of your house without issues.
Many wireless smart home devices are expensive, but this solution for your garage door is a relatively cheap one. I was surprised how cheap and easy it was, and I decided to share the solution on a blog post.
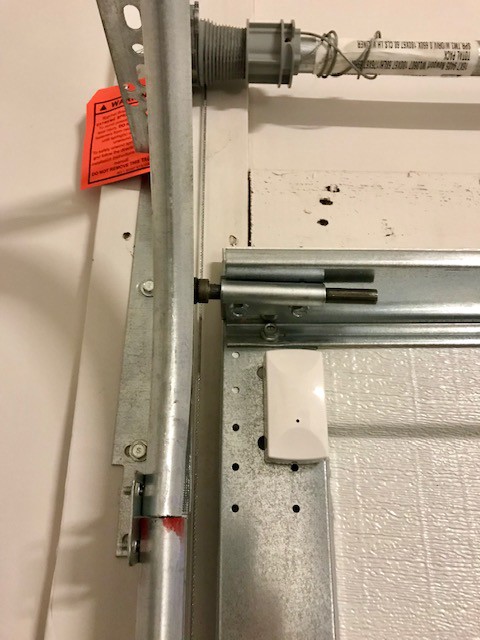
Whenever you want to remotely control a door or a gate, you will want to install a sensor that tells you whether it is open or closed. For garage doors, the best solution is the tilt sensor. A tilt sensor is a one-piece sensor unlike the two-piece door/window contact sensor, and it knows whether it is vertically or horizontally positioned. When attached to the top inside part of your garage door, it will tell you whether your garage door is open or closed.
Z-Wave Plus Reliability Garage Door Tilt Sensor

The solution I am describing so far is quite obvious. There are no special tips involved.
What is amazing is that you can use a fairly cheap Z-wave relay switch to open and close your garage door using your mobile phone and the Smart Things app. A relay switch is a 110V AC powered switch that has two wires, which can be connected to any device to turn them on and off. You can use a relay switch to control devices such as your garage door, pool pump, 110V Christmas lights, and your low voltage kitchen lights. The switch has two separate wires to allow/disallow the current to pass through to your device, and it does not care how many Volts are needed to power your device (please check specs of the devices for max limits on Amps and etc.).
NuTone NFS20Z

I used this Z-wave relay switch to control my garage door opener ($38.99 at the time of the post): https://amzn.to/2G69OEM
NuTone NFS20Z is a device that is designed to be used in an electrical box. I was lucky to have a double light switch right under my garage door controller button. One of the switches was redundant and I was not using it. So I ended up installing NuTone switch inside that electrical switch box.

- The relay switch needs a neutral and ground wire in addition to the line wire
- The two wires that control my garage door are connected to the low voltage wires behind my garage door button on the garage wall.
- Since low voltage is not as dangerous as the high voltage, I extended the low voltage wires from behind the garage door button to the electrical box and connected them to the two controlling wires of the relay switch.
Then I set up the Z-wave relay switch with my Smart Things hub by following the instructions for the switch and the hub. One important thing to note here is that you might need to include another Z-wave device between your hub and the garage if the distance from the hub and the garage is too long. In my case, there are a couple of dimmer switches in between. I will have to cover dimmer switches on another post.
As a final touch, I drilled a tiny hole in the electrical switch wall cover to be able to see the led on the relay switch.

The workaround I found was to create an IFTT applet: Every time the garage door switch is switched on, IFTT applet will tell it to switch off. Mine also sends me a notification every time this happens. The short burst of low voltage current is all the garage door needs to open or close. This way every time you press your virtual switch on you Smart Things mobile phone app, the garage door will either open or close, depending on its last state. And the tilt sensor tells you what state the garage door is in.
Please note:
Do not attempt this, if you are not qualified to do electrical work. Work with an electrician.
The links are generated under Amazon Associates program. Please use the links to support my content, when purchasing the devices in my post.
This post was first published on Medium on 4/7/2019 at this link.

Engin Bey, keyifle okudum.
Ben de akıllı ev teknolojilerine bir yerden başlamak için akıllı prizlerden almayı düşünüyorum. Özellikle ütüyü fişte takılı unutma, tatildeyken elektriğin gittiğini fark etme gibi konular için.
Ayrıca IFTTT’nin sıkı bir kullanıcısıyım. Google Maps ile Google Sheets ve Google Calendar’ı bağlayıp işe ve eve her girdiğim anı excele ve takvime bir satır olarak yazdırıp kendi life trackerımı oluşturdum. Bunun dışında “lostphone” yazınca telefonun sesini açıp müzik çalan, Android telefonumdan yapılan her çağrıyı google sheetste bir callhistory datası olarak tutan applet gibi şeyler var. Bir gün bu konu ile ilgili de yazı bekleriz sizden 🙂
Saygılar, selamlar.
BeğenBeğen
Sevindim. O zaman otomasyon konularina ilgi var. Anladım. Selamlar.
BeğenBeğen